使用Docker版本的Zigbee2MQTT控制Zigbee裝置 / Connect Zigbee Devices with Zigbee2MQTT Docker version
終於解放了Zigbee裝置的全部功能。
Zigbee網關 / Gateway for Zigbee
(圖片來源:e絡盟)
zigbee是現在智慧家庭中屬於低功率、低耗電的裝置設備。zigbee的特性使得它不能直接連上網際網路,也不能直接用手機控制它,必須要有能夠與zigbee通訊的專門設備與網關才能與zigbee裝置連接。
(圖片來源:蝦皮)
https://www.home-assistant.io/integrations/zha/
我的Home Assistant是用Docker的形式運作。一開始我想的很簡單,就用Home Assistant內建的ZHA (Zigbee Home Automation)來控制zigbee裝置就好了。根據Home Assistant的說明,上面這個cc2652p晶片能夠與Home Assistant相連。不過要讓cc2652p晶片的USB接收器給Docker連接這裡,我花了不少時間處理。順利設好ZHA後,zigbee裝置一配對就很快連上了,我很滿意。
但真正要開始使用的時候,我才發現發現哪裡怪怪的。
https://zigbee.blakadder.com/Tuya_LKMSZ001.html#fromHistory
這個zigbee裝置LKMSZ001是塗鴉出品的人體移動感應器,加上光源感應器以及按鈕一顆。但在Home Assistant的ZHA裡面,只能看到電量以及人體移動感應器而已。怎麼會這樣?難道我還要另外去買zigbee網關嗎?
https://www.zigbee2mqtt.io/devices/TS0202_2.html
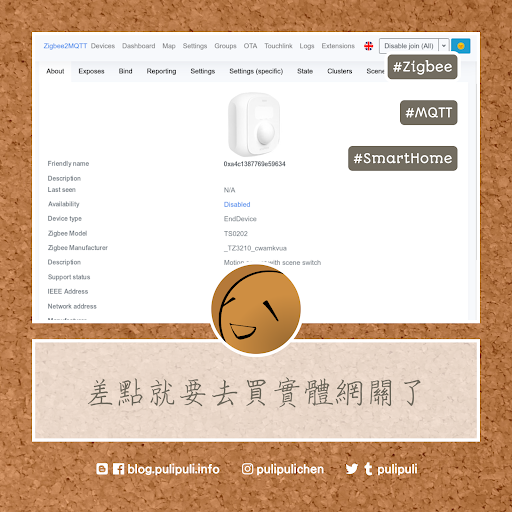
後來發現Zigbee2MQTT本身有支援這個感應器。那真是太好了,不過我要怎麼安裝Zigbee2MQTT呢?
https://forum.automata.id/t/topic/216
在Edwin所撰寫的「[教學] 在 Home Assistant 標準環境透過 Zigbee2MQTT 整合 Zigbee 裝置」中,他的做法是用Home Assistant的Supervisor功能安裝。不過我用的是Docker版本的Home Assistant,裡面並沒有Supervisor,並不能這樣安裝。
https://medium.com/geekculture/home-assistant-docker-zigbee2mqtt-3d8e0ba02d10
還好,Bernardo Teixeira也介紹了使用Docker的安裝方法:「Home assistant + Docker + Zigbee2MQTT」,大致上是可以運作的,不過有些細節需要調整。我記錄一下。
用Docker Compose安裝Zigbee2MQTT / Setup Zigbee2MQTT with Docker Compose
這個思路主要是用Docker Compose建構三個Docker容器:
- Home Assistant:主控台。
- MQTT:介接Home Assistant跟Zigbee2MQTT。
- Zigbee2MQTT:控制zigbee裝置。
我的docker-compose.yml如下:
version: '3.9'
services:
  ha:
    image: "ghcr.io/home-assistant/home-assistant:stable"
    volumes:
      - ./config:/config
      - /etc/localtime:/etc/localtime:ro
      - /run/dbus:/run/dbus:ro
    restart: unless-stopped
    privileged: true
    network_mode: host
    extra_hosts:
      - "host.docker.internal:host-gateway"
  mosquitto:
    container_name: mqtt
    image: eclipse-mosquitto:latest
    restart: unless-stopped
    network_mode: host
    volumes:
      - ./mosquitto/config:/mosquitto/config
      - ./mosquitto/data:/mosquitto/data
      - ./mosquitto/log:/mosquitto/log
  zigbee2mqtt:
    container_name: zigbee2mqtt
    depends_on:
      - mosquitto
    image: koenkk/zigbee2mqtt
    volumes:
      - ./zigbee2mqtt/data:/app/data
      - /run/udev:/run/udev:ro
      - /dev/serial/by-id/:/dev/serial/by-id
    network_mode: host
    devices:
      - /dev/ttyUSB0:/dev/ttyUSB0
    restart: always
    privileged: true
跟Bernardo Teixeira的主要差別在於網路的部分我都用「network_mode: host」,而zigbee2mqtt也直接開啟特權模式。
在啟動之前,請先執行以下指令,為MQTT建立設定檔案:
echo "persistence true" > ./mosquitto/config/mosquitto.confZigbee2MQTT設定檔案 / Configuration of Zigbee2MQTT
光是這樣設定還不夠,我們還要修改Zigbee2MQTT參數。請用以下指令以nano開啟Zigbee2MQTT設定檔:
nano ./zigbee2mqtt/data/config/configuration.ymal設定檔內容如下:
homeassistant: true
permit_join: true
frontend: true
mqtt:
  base_topic: zigbee2mqtt
  server: mqtt://localhost
serial:
  port: /dev/ttyUSB0
advanced:
  homeassistant_legacy_entity_attributes: false
  legacy_api: false
  legacy_availability_payload: false
device_options:
  legacy: false
重要的設定包括了:
- homeassistant: true:這樣才能跟Home Assistant整合。
- frontend: true:這樣才能開啟管理網頁。
- port: /dev/ttyUSB0:選擇正確路徑,這樣才能抓到Zigbee的USB接收器。
Zigbee2MQTT管理網頁 / Frontend of Zigbee2MQTT
設定好docker-compose.yml,以及配置好MQTT跟Zigbee2MQTT的設定檔後,就可用以下指令開啟這些服務:
docker-compose up如果順利的話,你應該不會看到服務一直在重新啟動,或是剛開啟就已經exit或stop。
接著再開啟網頁瀏覽器,連到該伺服器的連結埠8080,這是Zigbee2MQTT的管理頁面。此時可以拿好zigbee設備開始配對,然後Zigbee2MQTT抓到設備後就會自動加入,順利的話就能成功識別。
Home Assistant加入MQTT / Add MQTT in Home Assistant
回到Home Assistant,在Integration (整合)裡面加入MQTT。網址設定為127.0.0.1,其他就用預設即可。此時順利的話便能抓到MQTT,然後Home Assistant就會自動設定完成。
此時所看到的zigbee裝置,便是支援了人體移動感應器、光照度感應器、以及按鈕的完整功能了。
不過這個耗電量好像出乎意料之外的快。我在一個小時之前裝了100%電量的電池進去,現在已經剩下13%了,說好的Zigbee節能呢?不知道是哪裡設定有問題呀?希望有高手能給我些建議。
智慧家庭的平臺,你喜歡HomeKit、Google助理、Alexa、米家,還是HA呢?
下面留言說說你的想法吧!


您的文章給我幫助很大,感謝。
回覆刪除您好,
刪除能幫的上忙真的是太好了!